In a nutshell
- 🟡 Citric acid power: dissolves limescale and soap scum, chelates metal stains, and loosens embedded grime for faster scrubbing.
- ⏱️ Five-minute method: apply lemon juice (1:1 for light film; undiluted for heavy), wait ~5 minutes, scrub with a nylon brush, then rinse and dry.
- 🛡️ Safety & surfaces: never mix acids with bleach or ammonia; avoid natural stone; patch-test, wear gloves, and ventilate.
- 🧰 Smart variations: add fine salt for gentle abrasion; optionally neutralise with diluted baking soda after rinsing; alternate sessions with 3% hydrogen peroxide for mildew.
- 🔁 Maintenance: weekly 1:3 lemon-water spritz, thorough drying of grout lines, and annual resealing to keep whitening quick and effective.
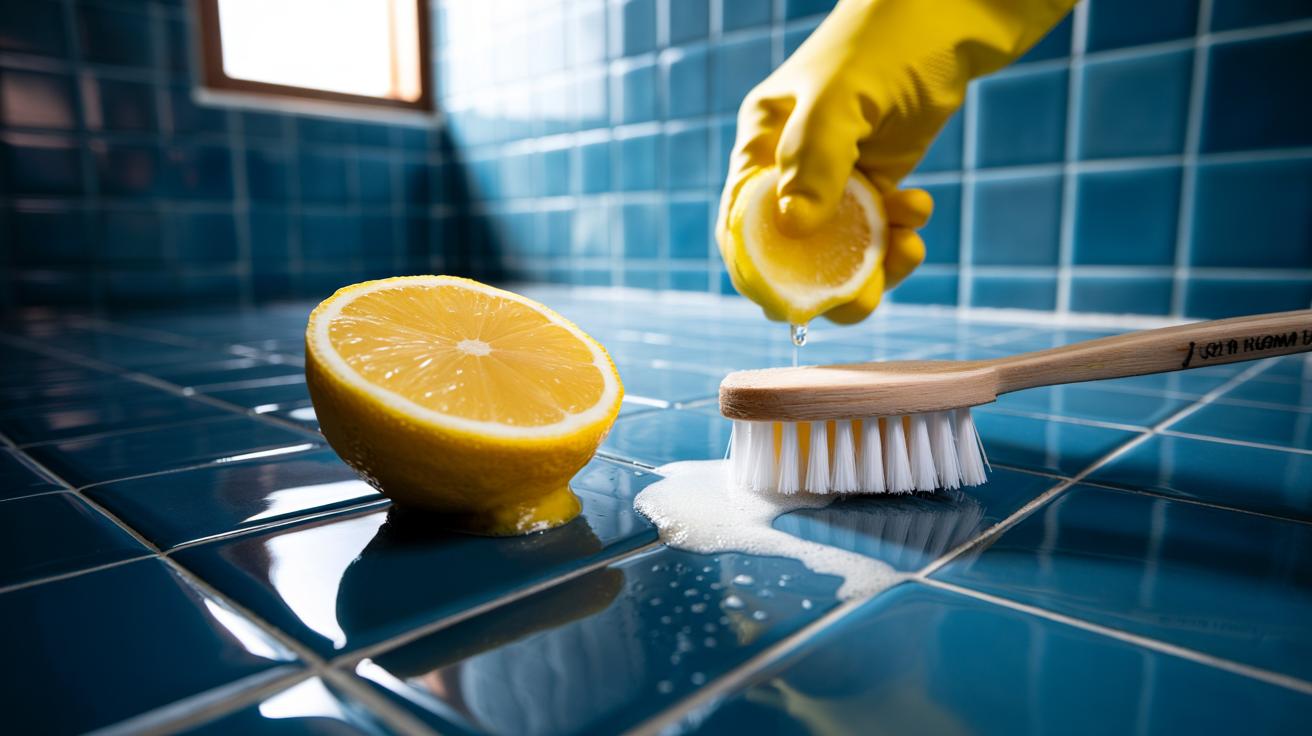
A lemon, a toothbrush, five minutes. That’s often all it takes to turn dingy grout into a brighter grid that makes the whole room feel cleaner. At the heart of the trick is citric acid, the naturally occurring compound in lemon juice that tackles limescale and soap scum with quiet ferocity. It’s not a harsh bleach and doesn’t come with the eye-watering fumes of ammoniated cleaners. Yet it dissolves mineral films, breaks up grime, and loosens mildew staining remarkably quickly. Used correctly, lemon juice is both swift and surprisingly gentle on ceramic tile while being tough on the dirt embedded in grout lines. Here’s why it works—and exactly how to do it in five minutes.
Why Citric Acid Lifts Stains So Fast
Grout gets dirty for two reasons: deposits form on top, and stains soak in. Citric acid attacks both. As a mild acid (lemon juice sits around pH 2–3), it reacts with alkaline residues such as limescale and soap scum. These are often calcium-based or bound up with minerals in tap water. The acid dissolves them at the surface, revealing grout’s original tone. At the same time, citric acid is an effective chelating agent, binding metal ions that discolour seams—think rusty tints near taps or orange marks from iron-rich water.
There’s also a mechanical advantage. When mineral films soften, embedded dirt and biofilms lose their “glue,” making scrubbing vastly more efficient. Short contact time, high payoff. The secret is not brute force, but letting chemistry do the heavy lifting during a brief dwell—about five minutes—before you touch the brush. Crucially, lemon’s mildness relative to stronger acids means you get action without the collateral damage that harsher agents can inflict on glazed tile or sealed cementitious grout.
Finally, the fragrance is a bonus. While not a disinfectant in the hospital sense, fresh lemon juice reduces odours and leaves surfaces smelling clean, without synthetic perfumes. Quick, simple, effective.
Five-Minute Method: Step-By-Step for Brilliant Grout
Start with clean access. Wipe the tile face so the lemon can reach the grout, not a film of shampoo or dust. Juice a fresh lemon or use bottled 100% lemon juice; both provide sufficient citric acid. For light grime, dilute 1:1 with warm water. For stubborn lines, use it undiluted. Apply generously along each grout line until visibly wet, then leave it alone—no scrubbing yet. That pause matters. During your five-minute dwell, the acid softens calcium deposits and loosens greasy binders that lock in stains.
After the wait, scrub with a soft toothbrush or a nylon grout brush, working in short strokes. Pressure helps, but the loosened film should lift readily. Rinse thoroughly with warm water to remove dissolved residues. If any patches remain, spot-treat undiluted, wait two minutes, and repeat the light scrub. For a gentle abrasive boost, sprinkle a pinch of fine salt on the brush; it increases bite without neutralising the acid as baking soda would.
| Use Case | Mix Ratio | Contact Time | Notes |
|---|---|---|---|
| Light film | 1:1 lemon juice:water | 3–5 minutes | Quick refresh, minimal scrubbing |
| Heavy staining | Undiluted lemon juice | 5 minutes | Scrub with nylon brush |
| Extra bite | Undiluted + pinch of fine salt | 5 minutes | Abrasive assist; avoid on soft sealers |
| Odour control | 1:1 lemon juice:water | 2–3 minutes | Rinse well |
Always finish by drying the grout lines with a microfibre cloth; lingering moisture invites new deposits. For ongoing brightness, spritz a 1:3 lemon-water mist weekly and wipe dry. It’s maintenance, not marathon cleaning.
Safety, Surfaces, and Smart Variations
Do not use lemon juice on natural stone such as marble, limestone, or travertine—acids can etch calcium carbonate surfaces permanently. On ceramic or porcelain tile with standard cementitious grout, you’re fine. Still, test an inconspicuous area first. Wear gloves if you have sensitive skin; acids can sting small cuts. Ventilate bathrooms, especially if you’re working at shower height. And one absolute: never mix acids with bleach or ammonia. Keep lemon-based cleaning separate from any chlorine products to avoid hazardous fumes.
Want a “deep-clean” variant? Pre-wash with warm, soapy water to strip oils, then apply undiluted lemon for five minutes. Rinse, and if the surface feels tacky, neutralise with a quick wipe of baking soda dissolved in water, followed by a final rinse—this step fizzes away leftover acid without diminishing whitening, because the active work is already done. Sealed grout? Lemon is generally safe, but skip the salt abrasive to protect the seal. After brightening, consider re-sealing grout annually; a good sealant slows new stains and keeps five-minute refreshes truly five minutes.
For mildew-shadowed joints, alternate lemon days with a 3% hydrogen peroxide application (on a different session, never mixed) to address biological staining. That rotation keeps lines clear without resorting to harsh bleaches or heavy-duty acids.
Lemon-powered whitening is efficient, low-cost, and oddly satisfying. In five quiet minutes, chemistry undermines the grime, leaving only a brief scrub between you and a sharper-looking floor or shower. Regular light passes trump rare heroic sessions, so make the ritual small and frequent. Bright grout elevates the whole room, from rented flats to family kitchens. Will you try the simple lemon-and-five-minutes approach this week—or tweak the method with salt, a post-neutralise rinse, or a planned reseal to make the results last even longer?
Did you like it?4.5/5 (22)